.JPG) | |
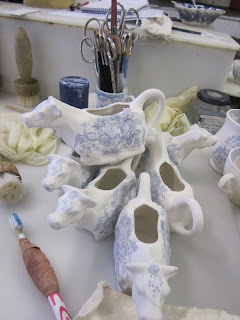
| A selection of white wares, ready and waiting to be decorated. |
Thursday 31 October 2013
Thursday 10 October 2013
Colour test photos
 |
| 1, 2, 3 & 4 colours, pre-hardening on |
 |
| Hardening on in the kiln |
 |
| Glazed and fired tests |
 |
| Single colours L= post hardening R=glazed & fired |
 |
| 2, 3 & 4 colours. (yellow is lost) 3 different drying methods. |
Wednesday 9 October 2013
Multi colour tests
This past fortnight I’ve been working with some new inks which I’ve made from stiff linseed and coloured stains. Ultimately, we’d really like to be able to transfer multiple colours onto a ware and I’m experimenting to find the most reliable process for this. Of course, there will be many complications to consider - colour change through firing, different firing temperatures for each colour, image registration, tissue shrinkage, ink set off, drying time between colours etc. Not to mention the usual variables of ink mixing, plate making, printing and transferring! Yet I do like a challenge.
I began with 4 new inks - green, yellow, blue and black. Each were made by carefully weighing out and mixing the same ratio of each ingredient.

.JPG)
Using the 2 original copper plates (to limit any variables) I printed and transferred each individual colour onto a tile. I then continued to build up additional colour runs onto the tiles and used 3 different drying methods between transfers.
Once each tile had been hardened on in the kiln, I applied a glaze and put them back into the kiln for their final firing. I’m patiently waiting for the kiln to cool down enough so that I can open the door.....
I began with 4 new inks - green, yellow, blue and black. Each were made by carefully weighing out and mixing the same ratio of each ingredient.

.JPG)
Using the 2 original copper plates (to limit any variables) I printed and transferred each individual colour onto a tile. I then continued to build up additional colour runs onto the tiles and used 3 different drying methods between transfers.

Once each tile had been hardened on in the kiln, I applied a glaze and put them back into the kiln for their final firing. I’m patiently waiting for the kiln to cool down enough so that I can open the door.....
Bristol Museum Visit
Earlier this week, my colleague Paul and I visited Bristol Museum where we were given access to the collection of Bristol underglaze transfer wares.
 |
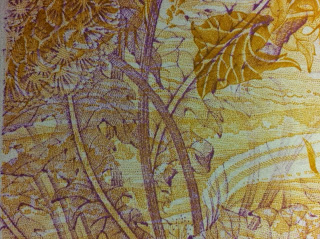
| 3 plates with the same pattern. There is huge variance in ink weight, colour and glaze. |
Although it was interesting to look at the pieces themselves, I found the box of tissue samples to be far more intriguing. There were folders full of printed tissues depicting a huge range of subject matter, many engraved with a different style. I was pleasantly surprised to see that some of the samples had a lot of scummy, inky marks on them.

 |
| Hotel back stamps on tissue |
Press Refurbishment
Steve, Dave and I recently spent a day in Stoke, looking at and testing out one of Burleigh’s old printing presses. As part of the project, Burleigh are having their presses restored by a local engineering firm V J Goodall. The aim is to have all three presses back into the transfer room and in good working order, making them both easier to operate and more reliable.
After a meeting at Burleigh we spent the afternoon at Goodalls, running some tests on a restored press and printing from a new laser engraved roller which we’ve had made. The tests went surprisingly well, with ink printing and transferring without too much difficulty.
Burleigh currently use a steel doctor blade but we tried replacing this with a softer urethane, which should increase the life of the chrome faced copper plates or the lasered rubber.
This switch was beneficial yet we’ve seen room for further improvement, particularly with the doctor blade. I now have the original housing from the press and I’m sourcing a supplier for thinner urethane blades which will fit within it. The correct shore hardness and angle of the blade edge are fundamental in giving the right ink distribution and surface wipe so I anticipate a good number of tests and trials until we find the correct combination. The next scheduled visit is for the 17th of October by which point I’ll have new doctor blades and also another laser engraved rubber roller.
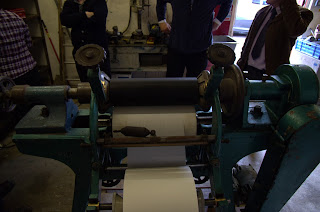 |
| Press after refurbishment @ V J Goodalls |
After a meeting at Burleigh we spent the afternoon at Goodalls, running some tests on a restored press and printing from a new laser engraved roller which we’ve had made. The tests went surprisingly well, with ink printing and transferring without too much difficulty.
Burleigh currently use a steel doctor blade but we tried replacing this with a softer urethane, which should increase the life of the chrome faced copper plates or the lasered rubber.
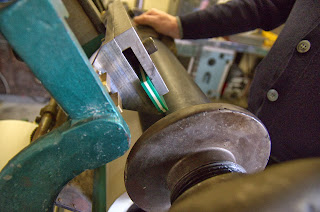 |
| Replacement doctor blade - urethane triple shore |
.JPG) |
| Test tiles printed from refurbished press, rubber sleeve & urethane blade. (fired and glazed) |
Impact 8
In late August, my colleagues and I traveled to Dundee to attend the Impact 8 International Printmaking Conference. Billed as ‘A celebration of interdisciplinarity and exploration through the medium of print', the progamme of events offered an insight into fellow printmakers current practice through panel discussions, presentations and demonstrations. The evenings were taken up with exhibition openings - an ideal opportunity to network, hanging out with old friends and making some new ones along the way.I thoroughly enjoyed the final day, which started off with the Open Folio sessions. I had a table top with lots of examples of prints, plates and wares and was thrilled by the interest and enthusiasm shown by fellow delegates. I had hoped to slip away to some of the demonstrations which were running at the same time but there was a constant stream of visitors to the table, keen to learn about the project so a few hours quickly slipped by. It was reassuring that the research was so well received by my peers, particularly for me as a printmaker - lots technical ink and paper related questions so I felt quite in my element.

Saturday was rounded off with a traditional Scottish Ceilidh- a perfect opportunity to get back to my Scottish roots after 6 months in south west England. The music was fantastic and lots of folk joined in with the dancing and seemed to really enjoy themselves, although the dance floor could’ve done with being about 4 x larger - it was a bit of a rammy. Good fun though.

Saturday was rounded off with a traditional Scottish Ceilidh- a perfect opportunity to get back to my Scottish roots after 6 months in south west England. The music was fantastic and lots of folk joined in with the dancing and seemed to really enjoy themselves, although the dance floor could’ve done with being about 4 x larger - it was a bit of a rammy. Good fun though.
Laser Engraved Sleeves
Having achieved a certain level of success with the flat, laser engraved polymer plates I decided to pursue an ‘in the round’ alternative for use on Burleigh’s presses (as they don’t have the ability to print flat plates). Unfortunately, the polymer isn’t available on rollers or sleeves so it’s taken a long time to get close to the same results again. Here are a some of test sleeves in two different rubber materials.

Frustratingly, as I can only print flat plates here I have to wait until our next Burleigh visit to try them out.

Frustratingly, as I can only print flat plates here I have to wait until our next Burleigh visit to try them out.
Thursday 11 July 2013
Plate and Ink tests
Over the past few weeks I've been spending some time in the workshop playing with printing plates and inks. There are so many variations and options for each that I'm trying to disregard the less successful results and fine tune the positives.
In terms of printing plates, I've now got the following:
Hand engraved copper
Photopolymer flexo
Letterpress
3D printed polymer
Laser engraved (both polymers and rubbers)
With each of these, there are multiple brands and manufacturers as well as production methods (exposure time, depth etc) and so this makes for many variables in terms of plate alone.
Below is a photo showing the results of the 3D printed plate that featured in the video I posted last month. Having 3D printed a matrix, I then inked it up and printed onto tissue. I was then able to transfer the ink from the tissue onto a scrap of ceramic. The three tests show slight variances in inks. I'd like to print onto a 3D printed ceramic and prove that we can print the object, the matrix and the decoration. Tricky...
Ink wise, I've been experimenting with different base materials - the traditional Linseed base (in various poise / thicknesses) Pine Tar (as is currently used at Burleigh) and also Resins which are more readily available. We have decided to invest in a mixer which is currently being modified for our needs. Once it arrives, I can concentrate on perfecting a black ink which must have both the correct tack and viscosity as well as being happy in the kiln and under a glaze. Ideally, it'd be great if there was time towards the end of the project to look at producing a range of colours.
In terms of printing plates, I've now got the following:
Hand engraved copper
Photopolymer flexo
Letterpress
3D printed polymer
Laser engraved (both polymers and rubbers)
With each of these, there are multiple brands and manufacturers as well as production methods (exposure time, depth etc) and so this makes for many variables in terms of plate alone.
Below is a photo showing the results of the 3D printed plate that featured in the video I posted last month. Having 3D printed a matrix, I then inked it up and printed onto tissue. I was then able to transfer the ink from the tissue onto a scrap of ceramic. The three tests show slight variances in inks. I'd like to print onto a 3D printed ceramic and prove that we can print the object, the matrix and the decoration. Tricky...
 |
| 3D Printed matrix, print and transfer |
Ink wise, I've been experimenting with different base materials - the traditional Linseed base (in various poise / thicknesses) Pine Tar (as is currently used at Burleigh) and also Resins which are more readily available. We have decided to invest in a mixer which is currently being modified for our needs. Once it arrives, I can concentrate on perfecting a black ink which must have both the correct tack and viscosity as well as being happy in the kiln and under a glaze. Ideally, it'd be great if there was time towards the end of the project to look at producing a range of colours.
 |
| Ink tests |
| Close up - the ink on the right has relaxed in the kiln, causing 'filling' in the tightly cross hatched areas. |
 |
| 3 different ink types, printed from hand engraved copper. (glazed and fired) |
Wednesday 5 June 2013
1st attempt at 3d printing plates
oooOooo..... exciting stuff. My colleague Pete Walters has very kindly set up the Objet printer to build a little test plate for me. I can't wait to take a look tomorrow morning.
Monday 3 June 2013
4 months in...
I'm now 4 months into the project so I thought it was about time to do a little blog update. Research is going well so far. I've been juggling many aspects of the underglaze printing process and hope to tie off some loose ends soon.
Plate wise - I've been testing various brands and manufacturers of polymer and rubber flexo plates. If you ever need to know shore hardness comparisons, I'm pretty well versed now! I've also received samples of laser engraved rubbers and I'll continue to look at the feasibility of utilising laser technologies, ideally with polymer materials. I'm still troubleshooting initial problems with uv exposed polymer plates holding too little ink by modifying these recipes. It may be that I need to have 2 different plates - flat, uv exposed for internal use at CFPR and laser engraved cylindrical ones for use at Burleigh.
Ink - having scoured every piece of documentation that I can find on the process (which unfortunately is not much at all) I've been producing small batches of ink with more traditional materials. Laterally, the potteries were using pine based inks yet I'm favouring good old linseed, a material that I'm far more familiar and comfortable with as a stone lithographer. By combining this with flux and stains I've had some encouraging results to date. I'm looking forward to testing out more ink recipes on small ceramic wares in the our new gradient kiln.
Blades - at Burleigh, the inked plates are currently wiped by a steel 'doctor' blade. Unlike in traditional printmaking where we wipe by hand, this step is mechanised, with the blade scraping the ink from the engraved roller prior to it coming into contact with the tissue. At the moment, I'm thinking that the steel blades should be replaced with plastic or urethane as this should slow down the wear on the plates.
Files - as many of the existing engravings are worn down and damaged, I've devised a way of digitising the imagery and cleaning the files up prior to transferring onto printing plates. Although it's fairly time consuming, it allows for the patterns to be digitally archived and will make the production of subsequent plates quick and easy.
So - progress is good, even if it can feel slow at times. I'm learning so much about many areas of both print and ceramics and although much of the information which I gather will be irrelevant to this project, I'm sure that it'll come in handy for future projects. (eg: chewing gum has a shore rating of 00 20 - fact)
Plate wise - I've been testing various brands and manufacturers of polymer and rubber flexo plates. If you ever need to know shore hardness comparisons, I'm pretty well versed now! I've also received samples of laser engraved rubbers and I'll continue to look at the feasibility of utilising laser technologies, ideally with polymer materials. I'm still troubleshooting initial problems with uv exposed polymer plates holding too little ink by modifying these recipes. It may be that I need to have 2 different plates - flat, uv exposed for internal use at CFPR and laser engraved cylindrical ones for use at Burleigh.
 |
| Relief print, separation and exposed flexoplate. |
Ink - having scoured every piece of documentation that I can find on the process (which unfortunately is not much at all) I've been producing small batches of ink with more traditional materials. Laterally, the potteries were using pine based inks yet I'm favouring good old linseed, a material that I'm far more familiar and comfortable with as a stone lithographer. By combining this with flux and stains I've had some encouraging results to date. I'm looking forward to testing out more ink recipes on small ceramic wares in the our new gradient kiln.
Blades - at Burleigh, the inked plates are currently wiped by a steel 'doctor' blade. Unlike in traditional printmaking where we wipe by hand, this step is mechanised, with the blade scraping the ink from the engraved roller prior to it coming into contact with the tissue. At the moment, I'm thinking that the steel blades should be replaced with plastic or urethane as this should slow down the wear on the plates.
 |
| Steel doctor plate sitting against a clean, engraved roller |
Files - as many of the existing engravings are worn down and damaged, I've devised a way of digitising the imagery and cleaning the files up prior to transferring onto printing plates. Although it's fairly time consuming, it allows for the patterns to be digitally archived and will make the production of subsequent plates quick and easy.
 |
| Sample of a digital file alongside the original, scanned plate |
Tuesday 30 April 2013
Ink tests
Back to black.
I'll be travelling up to spend another day at Burleigh later on in the week so I thought I'd have a play with some inks. The black ink that they currently use is really stiff which causes problems when it comes to transferring. I have a sample of their ink here so I'm going to loosen some off. I'm also going to take along some ink that I've made and see how it compares. I'll print some tests using each of them this afternoon to give me a rough idea.


Thursday 21 March 2013

Thursday 14 March 2013
A Visit to the Trasfer Room at Burleigh
 |
| Transfer tissue being printed |
 |
| Cow creamers with transfers pressed into place |
| Cups, ready to be brushed with soap |
 | |
| A conveyor transports the wares to be washed, prior to firing. |
After some initial tests here at the CFPR, I realised that I needed some lessons on the art of transferring. I spent a couple of days with the lovely ladies in the transfer room at Burleigh, learning lots of tricks and tips - a teacup was even sacrificed for me to practice on. Unfortunately, it didn't make it on to the conveyor belt as it failed the first quality inspection! I was praised for my efforts, not too bad for a beginner.
It was great to spend some time there- looking around the factory, getting a good look at the presses and some proper northern banter from the workers!
I've now got plenty to be getting on with and hope to have made a good amount of progress on both plates and ink before my next visit.
Tuesday 5 March 2013
Settling in.
I thought I'd start this blog by posting a few photo's from my first month here. I've been finding my feet - learning very basic ceramics, trawling through old books for info on the transfer process and setting up the wee workshop. I've made some ink, printed some transfers and fired some simple tiles which we then took to show the folks at Burleigh. They kindly let me borrow a beautiful, old hand engraved copper plate which I've been proofing. I'll then work with this image digitally and have a flexo plate produced so that I can compare results from both plates.
 | |||
| The workshop, complete with fancy press and pretty worktops |
 |
| A close up of the engraved copper plate (with chrome facing) from Burleigh |
| Transferring a printed image |
The transfer room at Burleigh
Here's a short video that The Guardian posted recently, showing the transfer room at Burleigh. You'll see the tissue being printed, hung on lines and passed around the room on pulleys. They are then trimmed down to size and pressed onto the wares, ready to be glazed and fired.
Project Overview

Subscribe to:
Posts (Atom)